Showing posts with label cooking. Show all posts

Monday, July 11, 2011

Twelve Pounds of Blueberries

This week we're in South Carolina with my sister-in-law Amy's family. It's hot and humid here! It kinda feels like I'm in southeast Asia when we step outside, but luckily we're a five minute walk from the beach, so there's a breeze that keeps it from feeling quite so hot. And apparently the weather allows the spiders here to grow huge! I saw one today that was easily three inches across and four inches top to bottom. But they're perfectly happy to stay outside in their giant webs, which makes me happy too.

Last week, though, was the first week of blueberry picking season, and Adam, Cynthia (Adam's mom) and I went picking. We ended up with twelve pounds of berries! When I was growing up, my family went berry picking every summer, and twelve pounds would have disappeared in a couple of days, but there's only three of us, so that's quite a few berries to get rid of.


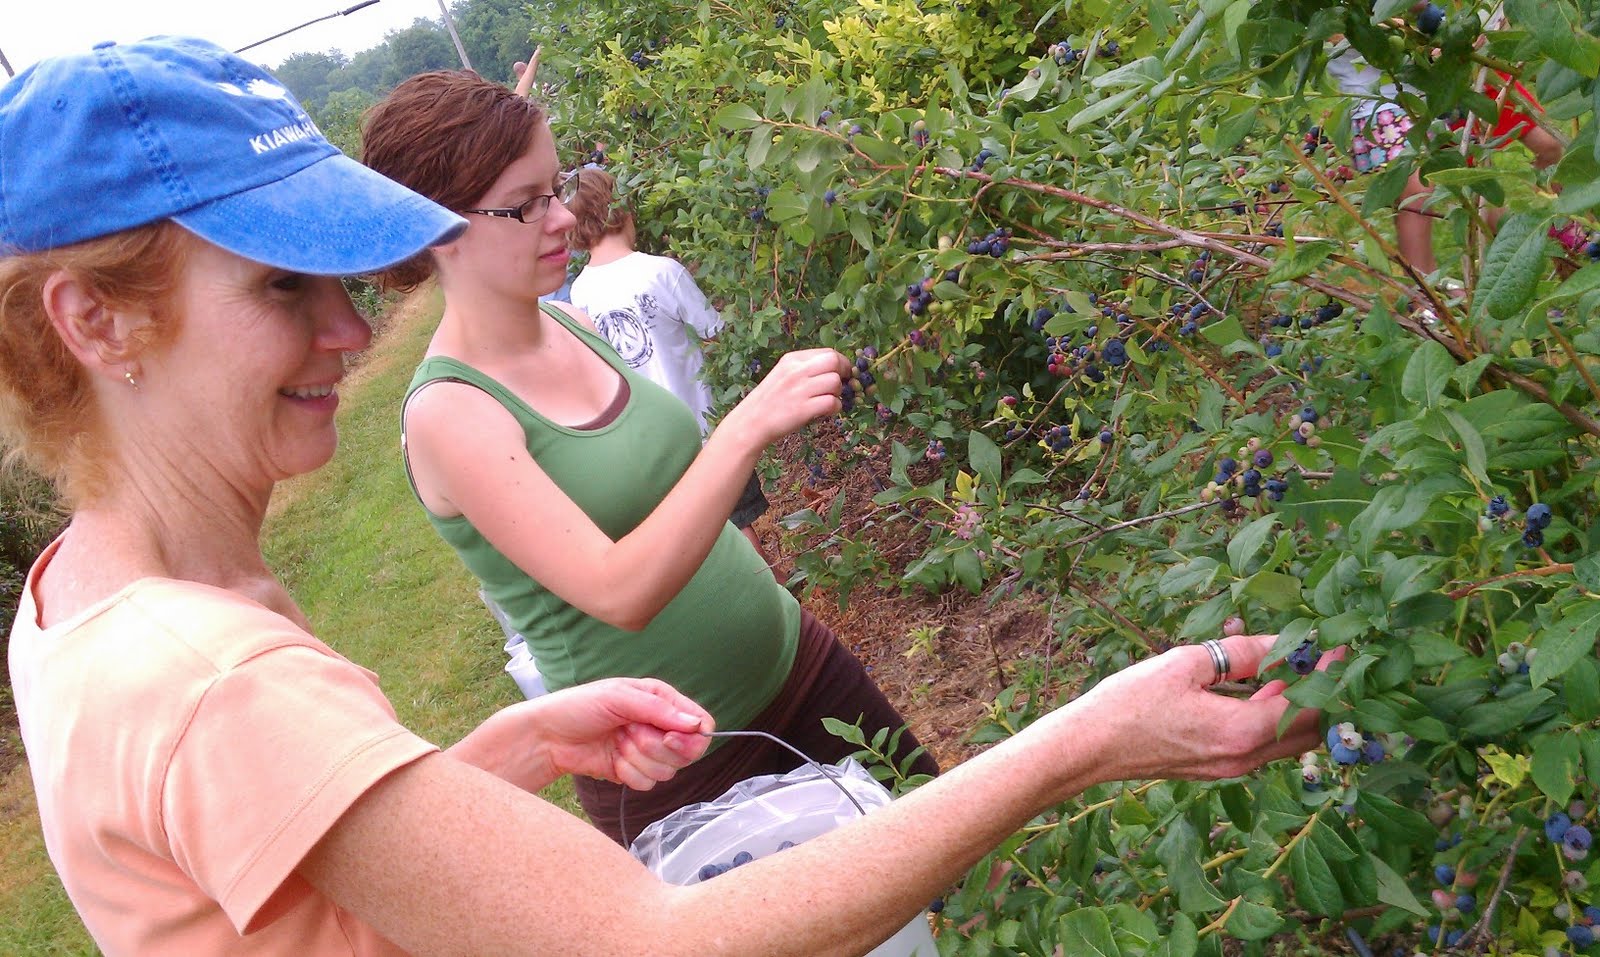
We ate some of the berries; we gave away some of the berries to friends; we made blueberry muffins for a church potluck (my first midwestern church potluck-- I secretly love jello salads!), and I made a giant blueberry cobbler for fourth of July. Both of the recipes were super yummy.

First, Blueberry Muffins:


(We did mini muffins)

Ingredients:
  • 2 cups flour
  • 2 1/2 tsp. baking powder
  • 1 c. sugar (if your blueberries are on the tart side) or 2/3 c. sugar (if your blueberries are on the sweeter side)
  • 1/2 tsp. salt
  • 1/2 c. chilled butter
  • 2 eggs
  • 3/4 c. milk
  • 1 tsp. orange zest
  • 2 c. fresh or frozen blueberries (If you are using frozen blueberries, do not thaw them. You don't want them to get juicy and turn the batter a purplish-blue color!)
Instructions:
  1. Preheat oven to 400. Lightly grease muffin tins.
  2. In a large bowl, combine dry ingredients. Using a pastry blender, two knives (which has never worked for me), or your hands (this always works for me!) cut the butter into the dry ingredients until coarse crumbs form. 
  3. In a small bowl, whisk the eggs and milk together. Make a well in the dry ingredients and pour the milk/egg mixture into the well all at once. Stir just enough to moisten the dry ingredients, and then gently fold in the blueberries and orange zest. The batter will be more like sticky dough, not runny like muffin batter often is. 
  4. Fill the muffin cups 2/3 full. If you're making regular-sized muffins, bake 15-20 minutes until the top is golden brown and a toothpick stuck into the middle of a muffin comes out clean. If you're making mini-muffins, 10-12 minutes should do it. Keep an eye on them after about 7 minutes have passed, because they bake very quickly. 
  5. Remove the muffins from the muffin pan and cool them on a wire rack. Or, remove the muffins from the muffin pan, and eat them right away. YUM! You don't even need any butter. 

Recipe #2: Blueberry Cobbler:

 
These ingredients and instructions are for a giant, 9x13 pan of cobbler. Just cut the recipe in half and use a smaller square pan, or even a loaf pan for half the amount of cobbler.

Ingredients:
  • 8 cups blueberries (fresh or frozen)
  • 1 c. sugar
  • 6 tbsp. cornstarch
  • 3 tbsp. lemon juice
  • 1/2 tsp. cinnamon
  • 1/4 tsp. nutmeg
  • ---------------------------
  • 2 c. flour
  • 1/2 c. sugar
  • 1 1/2 tsp. baking powder
  • 1/2 tsp. salt
  • 1/2 tsp. baking soda
  • 1/2 c. cold butter
  • 3/4 c. milk
Instructions:
  1. Preheat the oven to 375. Grease a 9x13 baking dish.
  2. Mix all the blueberry ingredients together in a large bowl; set aside. 
  3. Mix dry ingredients for dough mixture together (flour, sugar, salt, baking soda and powder). Using your hands or a pastry cutter, mix cold butter into flour mixture until it looks like coarse crumbs. 
  4. Mix the milk into the rest of the ingredients just until everything is moistened. It should look more like biscuit dough than runny batter.
  5. Pour berry mix into the bottom of your 9x13 pan. Use a spoon and drop the biscuit dough by spoonfuls on top of the berries until berries are mostly covered and dough is gone. Sprinkle the top of the dough with a little extra sugar (just so it looks pretty!).
  6. Bake for 35-40 minutes until the berries are bubbling and the biscuits are golden brown. I think I may have had to bake mine for a little longer, so don't be afraid to do that if you need to. 
  7. Let your cobbler cool for awhile, and then serve it with whipped cream. 
The cobbler was SO good, but I'm also very partial to pies and cobblers, much more so than cake, cookies, and brownies. You really could sub in any cobbler fruit for the blueberries. I bet peaches would be really yummy, or maybe a mix of nectarines and raspberries! 


Do you have a favorite summer dessert? Have you been berry picking yet this summer?


.

Tuesday, July 5, 2011

4th of July Cake

I saw this cake recipe in my latest issue of Taste of Home, and I decided to try it out for 4th of July.

It's a crepe cake, so you make the layers in a pan, just like a crepe or a pancake. It took probably just about as much time to make as a regular cake, but it definitely took more effort because you have to man frying pan the whole time, instead of just pouring the batter into a cake pan and sticking it in the oven. It was fun, though, and I'm glad I tried it.


Here's the recipe. It is supposed to make enough crepes and frosting for two small cakes, but I used a bit more batter for each crepe so I would have one cake that was a bit larger, and I ended up having extra batter left over, but that was fine since it allowed for mess-ups. I also added in a modification that I would do next time, which is adding a bit of extra baking powder. The layers I made turned out flatter than the original picture of the cake in the magazine, so I think a bit of extra baking powder would do the trick to make them fluffier.

Cake ingredients:

  • 1 package (18-1/4 ounces) red velvet cake mix

  • 2-3/4 cups whole milk

  • 1 cup all-purpose flour

  • 1/2 tsp. baking powder

  • 3 eggs

  • 3 egg yolks

  • 1/4 cup butter, melted

  • 3 teaspoons vanilla extract


  • Frosting ingredients:

  • 12 oz. cream cheese, room temperature

  • 1 cup butter, softened

  • 1/2 teaspoon salt

  • 8 cups confectioners' sugar

  • 3 teaspoons vanilla extract

  • Fresh blueberries


  • Directions:
    1. In a large bowl, combine the cake mix, milk, flour, eggs, egg yolks, butter and vanilla; beat on low speed for 30 seconds. Beat on medium for 2 minutes.

    2. Heat a lightly greased 10-in. nonstick skillet over medium heat; pour 1/4 cup batter (or 1/3 cup, if you want one bigger cake instead of two smaller cakes) into center of skillet. Lift and tilt pan to coat bottom evenly. Cook until top appears dry; turn and cook 10-15 seconds longer. Remove to a wire rack. Repeat with remaining batter, greasing skillet as needed. When cool, stack crepes with waxed paper or paper towels in between.

    3. For frosting, in a large bowl, beat the cream cheese, butter and salt until fluffy. Add confectioners' sugar and vanilla; beat until smooth. 

    4. To assemble two crepe cakes, place one crepe on each of two cake plates. Spread each with one rounded tablespoon frosting to within 1/2 in. of edges. Repeat layers until all crepes are used. Spread remaining frosting over tops and sides of crepe cakes. (Or do this process for just one cake). Garnish with blueberries. 

    If you're up for a fun variation on the traditional cake recipe, try this one out. And as always, if you do try it, let me know what you think!

    Recipe credit: Taste of Home 


    .


    Tuesday, February 8, 2011

    Delish {Cake Batter Pancakes}


    I. want. to. make. these. so. bad!

    Don't they look decadent? Maybe it's just my love for anything that tastes like cake batter. Regardless, I will make these sometime soon! And if you make them in the meantime, please tell me how delicious they were!

    Find the recipe here: How Sweet It Is blog: Cake Batter Pancakes

    .

    Wednesday, January 19, 2011

    Lime and Honey Glazed Salmon with Basmati and Broccolini


    This is my favorite way to cook salmon, for sure. Even if you're not a fish person, I don't know... you might change your mind on this one. And if you do like fish, your taste buds will thank you for putting this on your plate.

    It's super easy too: Saute, add rice, bring to a boil, bake in the oven, pour on some sauce, bake a little longer... done. One more bonus is that everything is cooked in one pot. So after dinner, you're not scrubbing all kinds of various pots and pans- just one!

    A few questions answered before we go to the recipe:
    1. Do I have to use basmati rice? Technically, no. Any white rice will do. However, basmati soaks up the broth and sauce so nicely that I strongly recommend it.
    2. Where do I get broccolini? I get mine from Trader Joe's. One package in the refrigerated produce section (next to the lettuce and baby carrots) is perfect for this recipe. I've seen it at regular grocery stores too, but it's more expensive. TJ's is your best bet.
    3. Do I have to buy shallots or can I just use the onion in my fridge? You can use onion, but slice it super thin. However, if you are going to the grocery store, buy the shallots. They're just right for this recipe.

    Now on to the recipe!

    Time: 40 minutes
    Serves: 4

    Ingredients:
    • 1/3 c. fresh lime juice
    • Zest of 2 limes
    • 3 tb. chopped cilantro (plus more for sprinkling)
    • 5 tsp. soy sauce
    • 2 1/2 tb. honey
    • 1 tb. olive oil
    • 3/4 c. thinly sliced shallots (about 3 large)
    • 1 1/2 c. basmati rice
    • 3 1/4 c. chicken broth (have a bit more on hand in case the rice gets dry while baking)
    • 4 small skinless salmon fillets (or 2 large ones)
    • 1 bunch broccolini, bottom inch trimmed off
    Directions:
    1. Preheat oven to 450.
    2. Saute shallots in oil in a Dutch oven (or other ovenproof skillet/pan) until shallots begin to soften and brown slightly, 4-5 minutes. Stir in rice, then stir in 3 1/4 cups chicken broth, and bring to a boil. Turn off heat, cover skillet securely with a lid, place in oven, and bake 10 minutes. (The rice will be just about cooked, and most of the broth will be absorbed. If it looks dry, pour 1/4 cup more broth over).
    3. Meanwhile, whisk together the lime juice, lime zest, honey, cilantro, and soy sauce. Set aside. (Tip: I like to make a little extra sauce because it is soo good!)
    4. Remove the pot from the oven. Sprinkle the rice lightly with salt. Sprinkle salmon with salt and pepper and place on top of rice, pressing in slightly. Arrange the broccolini around the salmon on top of the rice, pressing in lightly. Spoon about half of the honey-lime sauce over the salmon and the broccolini. Cover the pot firmly and return it to the oven. Bake for 8-10 minutes, until the fish flakes easily with a fork. Broccolini should be done too by this time (crisp-tender). Remove from the oven and drizzle the rest of the honey-lime sauce over the contents of the pot. Sprinkle additional cilantro, and serve everything from the pot. 

     If I have extra rice left over, it's pretty good in tacos or burritos the next day. Something about the lime and the cilantro is so yummy mixed with other taco/burrito-type ingredients!


    .

    Thursday, December 23, 2010

    Christmas Baking: Candycane Cookies

    My mom is the queen of Christmas baking. Every year since I can remember, starting right after Thanksgiving, the kitchen has overflowed with holiday treats, from homemade Almond Roca, to melt-in-your-mouth Russian Teacakes, to chocolatey peanut butter balls.

    This year, I decided to tackle one of the recipes I grew up with: Candy Cane Cookies. And I am here today to share them with you!

    I'll be fair and forewarn you that this recipe requires some time and dedication, but in the end, they're worth it! (As most Christmas cookies are).

    Recipe #1: Candy Cane Cookies


    Time: 1 hr. 30 min. 
    Yield: 3 dozen

    Ingredients:
    • 3 c. flour
    • 1/2 tsp. salt
    • 1 1/4 c. butter
    • 1 c. powdered sugar
    • 1 egg (plus one more for brushing over cookies)
    • 1 tsp vanilla
    • 1/2 tsp. almond extract
    • red food coloring
    Directions:
    1. Cream butter and sugar for 2 minutes, or until light and fluffy. 
    2. Beat in egg, vanilla, and almond extract (Don't skip the almond extract! It gives the cookies a subtle, delicious flavor).
    3. Mix in salt and flour.
    4. Divide dough in half, and add red food coloring to half of the dough. Go with more color rather than less, as the color lightens after the cookies are baked. 
    5. Now here's where the dedication comes in: Forming the cookies.

      1. Divide each set of dough into 36 balls, giving you a total of 72 red and white
        balls of dough.
        For each cookie, roll out one red and one white as shown in the picture.
        Gently twine the two pieces together.
        Once they are twined together fully, gently shape the dough into a candycane shape.
        You're almost done! Gently arrange candycanes onto a greased baking sheet. Beat one egg and use a pastry brush to lightly coat each candycane. You can arrange them pretty close together because the cookies will not rise or spread out in the oven.
        6. Bake the cookies at 350 for 10-12 minutes. Allow to cool before gently removing them from the pan with a spatula. Don't be discouraged if a few cookies break while you're doing this.
        7. Arrange the cookies on a pretty plate and watch them disappear!
        Let me know if you try them, or if you have any questions about the recipe!
        Merry Christmas!

    Friday, December 10, 2010

    Cooking: Thai Street Vendors

    I love Thai food, and so does Adam. There are nights when I have to stay late at work for some kind of special evening event (like this week's Christmas program), and there's not enough time to go home, cook dinner, and return to school, so those are the nights we order out. Those are the nights we enjoy being "forced" to order from the Thai restaurant down the street.

    We usually get the same things: Chicken Pad See Ew and Tom Kha Gai soup. That soup is so good. Spicy, sour, sweet, rich, hot, and tangy-- all in one delicious bowl. It's a mixture of coconut milk, lemongrass, Thai ginger, chicken, mushrooms, chilies, chicken broth, and lime juice. And you may remember that I tried cooking Pad See Ew awhile ago, and that it didn't turn out too badly, and I have since cooked it again, and it turned out quite nicely (although for once in my life I think I used too much garlic). You may also remember that "Pad See Ew" literally means "stir-fried with soy sauce". I laughed when I found that out. Who knew it meant something so generic? But it's comfort food, baby. Delicious comfort food.

    Coming around to the main point of this post, I was on a search one day for another Pad See Ew recipe, just to make comparisons to the recipe I had already tried. While searching the internet, I discovered a site that featured videos of Thai street vendors cooking traditional Thai dishes. I thought to myself, I've hit the jackpot! Videos of Thai people cooking Thai food! And sure enough, there is a video of how to cook Pad See Ew, not to mention dozens of others.

    Cooking food from a foreign culture for the first few times can be time-consuming because of unfamiliar ingredients and unfamiliar cooking techniques. For that reason, I haven't been able to try any of the recipes on the site besides the Pad See Ew, but I'm excited to try in the future. If you are up for a challenge, try one out. And if you do, please tell me how the cooking process went, and how the recipe turned out!

    In the myriad of videos, you can find Pad Thai, Garlic Shrimp, a recipe for Thai curry paste (yum), Thai sticky rice, Pork Satay, my favorite Tom Kha Gai soup, Thai iced tea, and so many more.


    Here's the link to the complete series of videos: Thai street vendor cooking

    Click the caption to the photo to access the video specifically for Pad See Ew. 

    Pad See Ew

    Remember, if you try a recipe, let me know how it turns out!


    .

    Sunday, October 31, 2010

    Sun-Dried Tomato and Tortellini Soup

    This is one my of favorite soups. It's so easy, and the flavor is wonderful.

    I've made the soup many times, and found a few shortcuts to save you time (for example, making it all in one pot, as opposed to using two pots), and a few substitutions to make it a bit more healthy (for example, not using two cups of half n' half).


    Sun-Dried Tomato and Tortellini Soup

    Serves: 4-6
    Time: 30 min.

    Ingredients:
    • 1 package refrigerated cheese tortellini (9-12 oz.- more is better. Sometimes I buy two packs and use all of one and half of the other)
    • 2 cans tomato soup
    • 2 c. vegetable broth
    • 2 1/2 c. milk (fat-free, 1%, 2%... anything you normally have on hand)
    • 1 c. half n' half
    • 1/2 c. chopped or sliced oil-packed sun-dried tomatoes (I use the TJ's julienne-sliced kind that come in a little glass jar. They're handy because I don't have to slice them myself!)
    • 1 tsp. onion powder
    • 1 1/2 tsp. garlic powder
    • 1 tbsp. dried basil (or more to taste)
    • Salt to taste

    Directions:
    1. In a large pot, stir together tomato soup, veg broth, milk, cream, tomatoes, and all seasonings. Bring to a simmer and add tortellini. Simmer for 15-20 minutes, or until tortellini is done. Add salt to taste. 

    That's it!! Stir it all together and let it simmer!

    I serve it with crusty garlic bread and a green salad, and  it makes a delicious dinner, and the leftovers are equally good warmed up for lunch the next day. I usually make the entire recipe for just the two of us just so we can have leftovers.

    If you're not sure what to do with the rest of the jar of sun-dried tomatoes, check back in the next week or so for a sun-dried tomato pesto recipe that's fantastic tossed with pasta or spread on toasted bread for a turkey sandwich. Yum!


    .

    Sunday, September 26, 2010

    Fettuccine with Roasted Butternut Squash, Garlic, & Herb Sauce


    This recipe was way too good to not share it with you.

    I looooove fall, and I am excited this year to experiment with seasonal produce, like squashes. Trader Joe's just got in all their fall items, and butternut squash is among those. I've been keeping my eyes open for recipes that incorporate fall/winter produce, and the September issue of Clean Eating has an entire guide for prepping and cooking all kinds of squash!

    Have I mentioned that I love Clean Eating? Every single recipe (every one!) is as healthful as it can be. It's great to know I can flip to any page and find a recipe that is low-fat, made with fresh ingredients, and super flavorful.


    So needless to say, this pasta recipe came from the pages of Clean Eating, and it calls for butternut squash. After eating this meal, I am a huge fan of butternut squash.


    Fettuccine with Roasted Butternut Squash, Garlic, and Herb Sauce

    Serves: 6
    Time: 1 hr. 

    Ingredients:
    • 1/2 of a whole butternut squash
    • 1/3 c. vegetable broth
    • 1/2 tsp. cornstarch
    • 1/3 c. olive oil
    • 1 tsp. Dijon mustard
    • 7 cloves garlic, minced
    • 1/4 tsp. salt
    • 1 tsp. dried basil
    • 1 tbsp. dried oregano
    • 2 tbsp. fresh sage, finely chopped 
    • 12 oz. fettuccine 
    • 2 c. chunked, cooked chicken breast meat (I had some leftover roasted bone-in chicken breast meat from a dinner I made last week, so I just coarsely shredded that and used it. Rotisserie would work too, or anything you have on hand.)
    • A few more tablespoons of finely chopped fresh sage 
    • Chopped hazelnuts (I didn't have any so I used chopped pecans and it was fine)
    • Extra olive oil for roasting squash

    Directions:
    1. Preheat oven to 400. 
    2. Prep squash. Peel it with a vegetable peeler, then cut it in half lengthwise and scoop out the seeds. Take one of the halves, slice it and dice it until you have a pile of little squash cubes (cubes should be about 1").  
    3. Toss squash cubes with olive oil and a sprinkle of salt and pepper; distribute evenly in a glass baking dish and bake at 400 for 25-30 minutes, or until squash is tender. 
    4. Meanwhile, cook pasta in boiling, salted water until al dente. Drain, toss with a little olive oil, and set aside.
    5. Meanwhile, make garlic, oil, and herb sauce. To make sauce, start by combining cornstarch and vegetable broth in a small bowl. Set aside. In a small saucepan over medium heat, cook the garlic, Dijon, salt, oregano, basil, and sage in 1/3 c. olive oil until garlic begins to brown, about 3-4 minutes, stirring occasionally. 
    6. Give a quick stir to the cornstarch/broth mixture; then add it to the pan. Stir until sauce thickens; then remove it from the heat and whisk it until completely mixed (e.g., broth and oil are no longer separating). Taste and add more salt if needed. (You may just want to eat spoonful after spoonful of the sauce right now. It is so good. But trust me: Wait for the final product!)
    7. Once the squash is ready, combine it with the garlic, oil, and herb sauce in a food processor and process until creamy and smooth. Taste and add more salt if needed. (Isn't it good?)
    8. Toss the butternut sauce with the pasta and the chicken. You may not want to add all the sauce at once. Add most of it; then taste it and see if it's the right creaminess. It's pretty rich, so add the rest if you're up for it. 
    9. Serve pasta and top with chopped hazelnuts and fresh sage. (The fresh sage really completes this dish). 
    10. ENJOY!

    Wednesday, September 8, 2010

    Quick and Easy #5

    I'm going to introduce you to one of Adam's favorite meals: the Chicken, Tortilla, and Black Bean Soup.

    Don't you love those meals that you can cook without even glancing at the recipe? This is definitely one of them because I've made it so often. I originally got it from a Bon Appetit magazine, but the recipe was kind of vague and hard to understand, and I've made some modifications, so you get the perfected version!


    Time: 45 minutes ( that includes 15 minutes of simmering time)
    Serves: 6

    Ingredients:
    • 2 dried ancho chilies
    • 5 cloves garlic
    • 2 medium tomatoes, cut into big chunks
    • 1 onion, cut into big chunks
    • Olive oil
    • 6 cups chicken broth
    • 2-3 c. cooked, shredded chicken (Rotisserie chicken from Costco is my fave)
    • 1 can black beans, drained and rinsed
    • 2-3 avocados (Depending on how much you like avocados. We loooove them so I put half an avocado into each of our bowls)
    • Chopped cilantro
    • Crushed tortilla chips
    • Lime wedges
    • Crumbled queso fresco 

    Directions:
    1. Fill a small pot with water and add the ancho chilies. Bring water to a boil, then reduce to a simmer. Let chilies simmer for about 5-10 minutes until chilies are softened. Turn off the heat. Use a pair of tongs to pull the stems out of the tops of the chilies. Use the tongs to swirl the chilies in the pot of water so all the seeds wash out. Let chilies sit in the water until you're ready to use them for their next step.
    2. While the chilies are simmering, shred the chicken. 2-3 cups is an estimate; I usually just use half of a rotisserie chicken and call it good. 
    3. In a food processor (if you don't have a food processor a blender might work), puree the seeded, soaked ancho chilies, tomato, onion, and garlic until very smooth. The smoother the better.
    4. In a large soup pot, drizzle some olive oil and heat up the pot. Pour in the puree and cook it over medium heat for 5 minutes to blend the flavors. Stir frequently.
    5. Add 6 cups chicken broth, shredded chicken, and black beans to the pot. Stir well and bring to a soft boil. Softly boil, uncovered, for 15 minutes. 
    6. Meanwhile, get your condiments ready. Chop the cilantro, dice the avocados, crumble the cheese, crumble the chips, and cut the limes. 
    7. When the soup is ready, dish into bowls and garnish with cilantro, avocado, queso fresco, chips, and lime juice. YUM!!! 

    You can do variations on the chicken. You don't have to use a rotisserie, but that's what's easy for me. I have a Costco close by, and a huge chicken is only five bucks, and it gives me leftover chicken for another recipe later in the week. If you have some chicken thighs in the freezer, just defrost them and throw them in with the chicken broth and simmer them in the soup until they're cooked through. Then take them out, shred the meat off the bones, and put the shredded meat back into the soup. You could do the same thing with breast meat. 

    I didn't know what ancho chilies were when I first found this recipe, but I was sure that my local Vallarta would carry them so I looked them up online to see what they looked like before I went grocery shopping. To save you a search online, here they are:


    They were easy to find once I knew what they were, and they're cheap! You get four chilies for $1.49, so that's enough for two pots of soup!

    As always, if you try the soup, let me know what you think!!


    .

    Tuesday, September 7, 2010

    Quick and Easy #4

    This, friends, is a comfort food night.

    It's a rare cool and cloudy September day here in L.A., and we've got to make the most of it!

    Therefore, I present you with Bow-Tie "Lasagna".

    (You will quickly see, however, that I thought I bought bow-tie this week, but did not find it in the cupboard tonight, so dinner turned into a use-up-whatever-pasta-I-have night. And that huge penne noodle right in front is bothering me now).

    Husband loved it, and if you have kids, they will love it too. The original recipe is from tastykitchen.com.


    Time: 25 min
    Serves: 6

    Ingredients:
    • 1 lb. ground beef, ground chuck, ground turkey, or whatever you prefer
    • 5 c. bow-tie pasta
    • 3 c. spaghetti sauce
    • 1/2 tsp. garlic powder
    • 1/2 tsp. garlic salt
    • A few twists of the pepper grinder
    • 1 tsp. Italian seasoning (I didn't have any so I just shook my containers of oregano and basil over the pot a couple times)
    • 1/2 c. mozzarella
    • 1/2 c. sour cream
    • Olive oil

    Directions:
    1. Cook pasta according to package directions. Drain, return to pot, and drizzle/toss with a little olive oil. 
    2. Meanwhile, cook ground beef in a pan until no longer pink. 
    3. When pasta is ready, mix in the spaghetti sauce. Add cooked meat and seasonings; stir well and heat through. 
    4. Fold in the cheese and sour cream and cook over low heat for a few minutes to allow the cheese to melt and the flavors to combine. 
    5. Serve it up! It was great with garlic bread and a salad. I was really craving parmesan green beans, but the fresh green beans that I forgot to use up last week weren't edible anymore. Oh well. 

     .

    Saturday, September 4, 2010

    Quick and Easy #3

    My ambitions for posting these recipes every day were a little unrealistic, I think.

    But here's another one anyway!

    I got this recipe from my trusty friend, Design Sponge. D*S got this recipe from a gal by the name of Kate Flaim, whose personal blog is chock-full right now of fast and fresh dinner ideas-- the main lists of ingredients comprised mostly of locally grown veggies from her weekly CSA box.

    Today's meal is Kate Flaim's Absorption Pasta. It's so light and flavorful and I can't wait to try some of the winter season variations that she mentions on the original D*S post.

    One modification I'll mention first is that Kate calls for 2-3 slices of chopped pancetta, which is then cooked until crispy, the fat drained off, and mixed in with the pasta near the end. I'm not a bacon-flavor person (I've never liked bacon), so I substituted chopped proscuitto for a milder flavor. I will list the ingredients with proscuitto, but revert to pancetta if you prefer a bacon flavor.


    Serves: 4-6
    Total time: 30 min.

    Ingredients:
    • 3/4 lb. penne (I used whole wheat penne for more nutrition)
    • 2 finely sliced shallots or 1/2 white, yellow, or brown onion, very finely sliced
    • 4-5 sliced of proscuitto, chopped
    • 1 lb. asparagus
    • 1/3 c. crumbled feta
    • Zest of one lemon (Save the rest of the lemon for garnish)
    • 4 c. chicken stock
    • Salt and fresh-ground pepper to taste
    • Olive oil for sauteing 

    Directions:
    1. Cut 1-2 inches off the end of your asparagus. Then cut the asparagus into 2-inch lengths, keeping the stalk parts separate from the tips (they will need to cook for different amounts of time).
    2. Saute the shallots/onions in a drizzle of olive oil until soft and lightly browning, 1-2 minutes. When shallots soften, add penne and stir the penne around to toast it just a little. 
    3. Pour in 2.5-3 cups of the chicken stock. The stock should come just barely to the level of the pasta. Bring to a boil, stirring frequently, and then reduce to a simmer and stir occasionally for 5-7 minutes. 
    4. After 5-7 minutes, the chicken stock should be about half-absorbed by the pasta. Keep stirring occasionally to allow all the pasta to be coated by the absorbing chicken stock. Toss in the stalk parts of the asparagus and stir them into the pasta. Let cook, stirring more frequently as the stock cooks away, for 2-3 more minutes.
    5. When the pasta is getting close to done (keep testing the pasta as you stir), add the asparagus tips. 
    6. You don't want the pan to get totally dry, so add a splash or two of the extra stock if things start to dry out. The pasta should be coated with a silky-sticky-barely-there "sauce". The starch in the pasta is what helps to thicken the stock that hasn't boiled away completely. 
    7. When the pasta is al-dente, remove from the heat and stir in half of the feta, half of the proscuitto, and half of the lemon zest. Season with salt and pepper to taste. 
    8. To serve, dish the pasta onto plates and top each serving with more feta, more proscuitto, and more lemon zest. I love fresh lemon, so I serve each plate with an extra lemon wedge to squeeze over. 

    If you try this recipe and you like it, check out Kate's original post on Design Sponge for the winter variations I mentioned. Can't wait to try those-- especially her sausage and kale suggestion!

    Thursday, August 26, 2010

    Quick and Easy #2

    This recipe is so flavorful and so quick to make... we love it!

    I have never come up with a great creative name for it, so on my weekly meal plan I always call it TJ's Chicken Sausage Pasta. (I usually buy the chicken sausage from Trader Joe's. But what I used in tonight's recipe is actually from Costco, and is just as good).

    So here you go!


    Total time: 20 min.
    Servings: 4


    Ingredients
    • 1/2 lb. whole wheat spaghetti
    • 1 package pre-cooked chicken sausage (5-6 links per package) (Try any flavor! The one in tonight's meal was spinach-garlic-asiago cheese from Costco. Trader Joe's has several other flavors as well).
    • Olive oil
    • 1/2 tsp. onion powder
    • 1/2 tsp. garlic powder (or more if you love garlic)
    • 1 tsp. dried basil
    • 1/2 c. sliced oil-packed sundried tomatoes
    • 1 can artichoke hearts, rinsed, drained, and cut into fourths
    • 2-3 tbsp. pine nuts
    • 2-3 handfuls of spinach leaves
    • Salt and pepper to taste

    Directions:
    • Get the spaghetti started cooking. 
    • Slice the sausage links and saute them with a splash of olive oil plus the onion, garlic, and basil. Saute the sausage until the pieces are browning a just a little.
    • Throw in the sundried tomatoes. Drizzle a little of the oil from the jar of tomatoes into the pan. This adds flavor. 
    • Continue sauteing for 2-3 minutes, and then throw in the artichoke hearts and the pine nuts. If the pan gets dry, drizzle in a little olive oil.
    • Saute for 2-3 minutes more in order to blend the flavors. 
    • Taste and see if you need to add salt and pepper.
    • Just before you are ready to serve, toss in the handfuls of spinach leaves. Saute until they start to wilt and turn bright green. Drizzle with olive oil if the pan gets dry. 
    • Serve on top of the spaghetti! 
    • I usually make a side salad with this dish, which is what I did tonight. 

    Enjoy!


    Friday, August 20, 2010

    Quick and Easy

    Ever since last year's first few weeks of school, I have been planning to rethink my menu choices for the beginning of the school year. Why? Because the first few weeks of school involve long hours in the classroom, and I don't have time to cook a long and involved dinner when I get home.

    So I have been planning to compile a list of quick and easy dinner recipes that are good for twelve-hour workdays, and upon the suggestion of a friend (thanks Audra!), I thought I'd share the recipes with all of you.

    Cooking from a box makes me depressed, so all of the recipes I will post over the next few weeks are (for the most part) from scratch. I tried to find recipes that don't call for lots of veggies to be chopped up (that's time-consuming) or lots of pots and pans to be used (that creates a hectic, messy kitchen). Also, hopefully you live close to a Trader Joe's because that is my favorite place to buy groceries, so lots of the ingredients in these meals are found there. You'll be able to find the ingredients elsewhere, but it just might be a little bit more expensive (for things like sundried tomatoes and artichoke hearts).

    To get us started off, here's a meal that we ate this week that definitely falls into the Quick-and-Easy category.


    Parmesan Fish with Asparagus-Cooked-the-Best-Way-I've-Found-Yet and Ciabatta Garlic Bread


    Parmesan Fish:

    Ingredients:
    • 1 fish fillet per person (Recipe calls for catfish, but I used something called basa fish, which is apparently a cousin of the catfish. You could also use cod, sea bass, orange roughy, or something similar)
    • 3/4 c. unseasoned bread crumbs
    • 4 tbs. grated Parmesan cheese
    • 1 tbs. chopped dried or fresh parsley
    • 1/2 tsp. salt
    • 1/4 tsp. pepper
    • 1 tsp. dried oregano
    • 1 tsp. dried basil
    • 1/2 tsp. garlic powder
    • Paprika
    • 1/3 c. butter, melted
    Directions:
    • In a wide, shallow bowl, combine bread crumbs, Parmesan, parsley, salt, pepper, oregano, basil, and garlic powder. You can increase the amount of the spices if you like stronger flavor (like me). 
    • Dip each fish fillet in butter, then in bread crumb and Parmesan mixture. 
    • Arrange fillets in a baking dish and sprinkle with paprika. If there is any butter left over, drizzle that over the top of the fish, too. (Tip: Before you put the fish into the pan, double-line it with aluminum foil, so when it's time to clean up, all you have to do is throw away the foil. No pan-scrubbing required!)
    • Bake at 375 for 25-30 minutes until fish flakes easily with a fork. 


    Ciabatta Garlic Bread:

    *Note: I buy a mini par-baked Ciabatta loaf from TJ's for $1.99. It is our favorite bread to have as a side for any meal, and one loaf lasts the two of us two meals. I cut it in half and freeze the other half. 

    *Note: Start the garlic bread when the fish has 15 minutes to go.

    Ingredients:
    • 1 Ciabatta loaf
    • Butter
    • Garlic salt
     Directions:
    • Slice the bread in half vertically.
    • Spread each half with butter.
    • Sprinkle each half with garlic salt.
    • Put the halves back together and stick it in the oven next to the pan of fish when the fish has ten minutes left. (Don't wrap it in foil). When the fish is done, your bread will be hot, soft, and just a little crispy around the edges. YUM. (This bread is seriously like dessert for me).


    Asparagus:

    *Note: The asparagus cooks very quickly, so start this when the fish has just about five minutes to go in the oven. 

    Ingredients:
    • 1 lb. asparagus
    • 1 tbs. olive oil
    • 1 tsp. lemon juice
    • 1 tbs. Parmesan cheese
    • Salt
    Directions:
    • Trim ends off of asparagus
    • Pour enough water into a wide frying pan to be about 1" deep. Bring water to a boil, and add asparagus. 
    • Most important step: TIME THE ASPARAGUS! If you have nice thin stalks, boil (covered) for only one minute. If your asparagus has thicker stalks, boil (covered) for two minutes. As soon as your timer beeps, turn off the heat and drain the asparagus. 
    • Toss asparagus with lemon juice, olive oil, Parmesan, and salt to taste.


    In 25 minutes, you will have a yummy dinner on the table! I'm not a wine connoisseur, but I think some kind of white wine would be really good with this. 

    If you try this meal, let me know how it turns out for you!


    Wednesday, August 11, 2010

    Mom's Greek Salad

    My mom makes the best Greek salad. It's all in the dressing, and I'm about to share it with you.

    Dressing:
    • 1/2 c. olive oil
    • 1/4 c. red wine vinegar
    • Crushed garlic (more or less, depending on preference; I use 4-6 cloves)
    • Juice of 1/2 lemon
    • Generous amount of dried oregano (2-3 tbsp.)
    • Salt and pepper to taste (add salt at the very end; give a shake or two, then dip a fork in and taste it; repeat as necessary)

    Directions:
    • Whisk everything together until it's all blended.    


     For salad:
    • Romaine, chopped
    • Feta cheese, crumbled
    • Cucumber, chopped/diced/however you like it in a salad
    • Green bell pepper, chopped
    • Onions, finely sliced
    • Kalamata olives 
    Directions:
    • Toss it all together with the dressing
    • Voila! 
    • Feel free to leave out anything you don't care fore (I'm not big into Kalamata olives, or onions for that matter) 

    yum YUM YUM!

    Friday, August 6, 2010

    Redeeming the Pioneer Woman

    My last post was about chicken piccata, and I didn't give the Pioneer Woman a very good review.

    I should probably balance that review with one of her recipes that is INCREDIBLE. I hardly ever make it because, unfortunately, it's not exactly the picture of healthfulness, and there are always leftovers, and the leftovers call to me from the fridge to snack, and snack frequently. Therefore, I'd rather just not have the temptation sitting there. It is, though, oh so good.

    Here you are:

    Pioneer Woman's Baked Lemon Pasta

    Thursday, August 5, 2010

    Chicken Piccata vs. Chicken Piccata

    The Battle of the Chicken Piccatas.

    Normally, I trust pretty much everything The Pioneer Woman has to say. I thought her recipe for chicken piccata looked divine, and I am a HUGE fan of anything containing the lemon/garlic combination, and on top of that, add white wine into the sauce? Sold.

    Well, I made her recipe. Here it is: Pioneer Woman's chicken piccata. And here's a pic:


    DELISH, right?

    We thought it was ok. I mean, I'd never had chicken piccata before, so I had nothing to base it on, but... I don't know... something was lacking. Maybe the sauce was too strong? Too tangy? Too rich? Maybe a combo of all three?

    So anyways, that was a couple months ago. Last night, I figured I'd give another version of chicken piccata a whirl, and here's the recipe I tried: Eating Well's version of chicken piccata. And here's a pic:


    Looks pretty good, but to be honest, Pioneer Woman's looked a lot better. Well, surprise, surprise! Based on a unanimous decision by the husband, the second version was the winner.

    Why was it better, you ask? 
    1. Not as overwhelming. The flavors were far more subtle, and rightly so. Especially the lemon.

    2. Not as rich. About halfway into PW's version, both of us had to push our plates away. It was good, but   too rich. Perhaps due to the heavy whipping cream on the list of ingredients.

    3. Healthier. The second recipe calls for no cream at all (okay, I did pour a little half n' half in, but we're talking like 1/8 of a cup... not 3/4 of heavy cream), and it calls for about half the cooking fat (3 tsp. olive oil & 2 tsp. butter, vs. 4 tbsp. olive oil and 5 tbsp. butter).

    4. Garlic-y. The second version called for several cloves of garlic. I always double it. Or triple it.

    5. Mushroom-y. We looove mushrooms, but if you don't, leave em out.

    I did add extra lemon juice to the sauce because I couldn't really taste it at first, and I thickened the sauce a bit more as well. It was rather thin as is.


    If you try either one, let me know what you think!